When I first started running, I thought for sure it would be a bad combination with yoga. Running is repetitive, it can be hard on the body, and it's fast.
After my first few runs, I felt sore and tight, despite my thorough stretching session afterwards. I spent all that time practicing yoga to loosen my muscles; it seemed silly to then tighten them up with one little run.
A few runs and a bit of research later, I changed my mind. Running and yoga complement each other quite well, and I don't need to end up sore and tight after my runs.
The breath control (pranayama) we practice in yoga actually helps me keep my breathing even when runs get tough, and it's especially helpful after a hard run. Plus, there is a certain peace that accompanies running (and walking). That repetitive motion allows your mind to clear, and the path that lies before allows your eyes to focus on the horizon. Add some motivating music, and you've got quite the relaxing and stress-relieving workout!
My friend Bob (BOBBYD31) SparkMailed me recently to ask about yoga. He's a runner and, like many of you, battles tight hips and hamstrings. He wanted to try yoga but wasn't sure where to start. I gave him some suggestions for DVDs and books--and did one better. I'm a certified Ashtanga yoga teacher, so I decided to create a routine for him and other runners to help them stretch out after a run and keep his muscles healthy and loose.
Here are a baker's dozen poses to help runners (and cyclists and walkers). Hold each pose for 5 breaths or longer if you'd like. You'll need a mat and a yoga block (or a chair) for these poses.
Before you begin, remember these precautions:
- Do not start a yoga routine or any other workout without clearance from your doctor.
- These poses are not suitable for pregnant women.
- Each pose should be done in a slow and controlled manner, without bouncing or forcing, which can cause your muscles to tighten, increasing your risk of injury. Stretch in a slow, steady motion to the point of “mild discomfort.” If you are stretching to the point of pain, you have stretched too far. Learn to "respect your edge"--never go beyond it.
- This routine can be integrated into a post-run stretching routine. You can also do it any time of day. If you're not doing the stretches immediately following a workout, I recommend a 10-minute cardio warmup before starting this routine. Warm muscles are easier to stretch.
- These poses and the accompanying photos are modified for people with tight hips and hamstrings.
- A breath is one full inhalation and one full exhalation through the nose. Hold each pose for five breaths, or longer if you'd like.
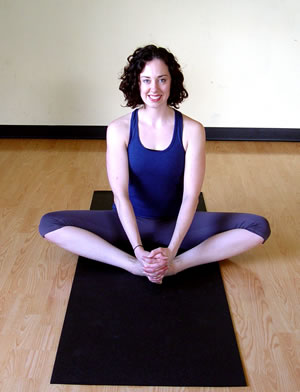
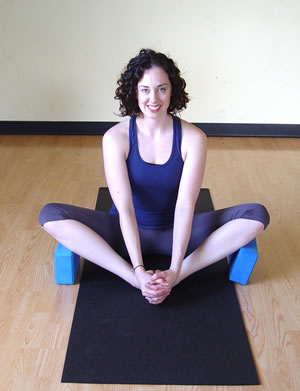
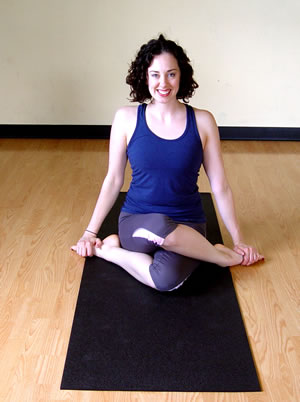
Butterfly/cobbler stretch (Baddha konasana):
Benefits:
Opens the groin and hips; stretches the inner thighs
Forward folding stretches the back
How to:
- Sitting tall on your mat, bring the soles of your feet together.
- Interlace your fingers and place them around the toes.
- Sit tall, rolling the shoulders back, and gaze past the end of the nose.
- Lean forward for a deeper stretch, stopping when you start to "feel" the stretch.
- With every inhale, feel your spine growing longer (imagine the crown of your head reaching out in front of you to the wall); with every exhale, allow the body to sink lower (the chest is getting closer to the floor).
TIP: Use blocks under your knees if your hips are particularly tight.
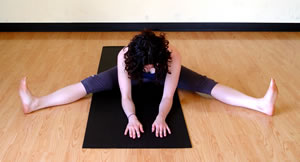
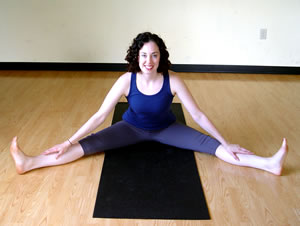
Seated wide angle forward fold (Upavistha konasana):
Benefits:
Stretches the hamstrings and calves; the forward fold straightens and lengthens the spine
How to: - From butterfly pose, extend your legs out to either side of you at a 90 degree angle.
- If you can straighten the legs, flex the feet, and engage the quadriceps (by lifting your knee cap) to keep your knees from locking.
- Lean forward slightly and place your hands on the mat.
- With every inhale, feel your spine growing longer (imagine the crown of your head reaching out in front of you to the wall); with every exhale, allow the body to sink lower (the chest is getting closer to the floor).
TIP: Bend your knees as much as you need to, and bring the legs closer together if needed.
Cow-face fold (Gomukhasana):
This is one of my favorite poses! It's incredibly effective for stretching the pirifomis, a small muscle deep in your glutes.
Benefits:
Stretch out your glutes and hips--including the hard-to-reach deep muscles--and your IT band.
How to: - From a seated position, bring your left foot back by your right hip; stack your right knee on top of your left, with your right foot by your left hip. (If your hips are tight, your top leg/knee might stand rather than lie flat--that's OK.)
- Grab your feet with your hands (left foot in right hand; right foot in left), and lean forward slightly, gazing past the end of your nose.
- For a deeper stretch, flex your feet. You can also place your hands on the floor in front of you and lean forward to intensify the stretch.
- Repeat on the other side, with the left knee on top this time.
TIP: Make sure both hips stay on the ground in this pose.
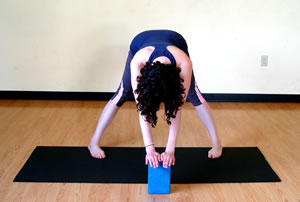
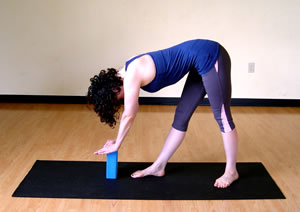
Standing wide-legged forward fold (Prasarita padottanasana):
Benefits:
Opens the hips and stretches the hamstrings
How to: - Turn to the right and step your feet about a leg's length apart.
- Turn your heels slightly out and your toes slightly in. (Imagine you're slightly pigeon-toed.)
- Inhale, stand tall and stretch your arms out to a T.
- Exhale, fold forward, taking your hands to the floor or a yoga block. Allow your head to hang down, straightening your spine. Gaze past the end of your nose.
- After five breaths, inhale as you roll up slowly, engaging your abs and pressing in to your feet to help you rise.
- Exhale, step your feet together.
TIP: Keep your knees slightly bent if your hamstrings are tight. If you straighten your legs, take care not to lock your knees. For a deeper stretch, engage the quadriceps by lifting up on your kneecap.
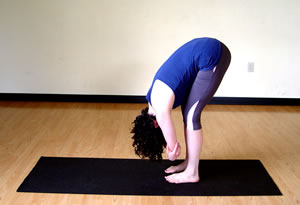
Standing forward fold with "ragdoll" arms (Uttanasana):
Benefits:
Stretches the hamstrings and straightens the spine.
How to: - Inhale and take your hands to your hips as you step your feet hips' width apart.
- Exhale, fold forward. If you can straighten your legs in this pose, grasp each elbow with the opposite hand. If you can't straighten your legs or need more support, place your hands on a yoga block (or even a chair, if you prefer).
- Allow your head to hang down limply--like a ragdoll, straightening your spine. Gaze past the end of your nose.
TIP: Keep your knees slightly bent if your hamstrings are tight. If you straighten your legs, take care not to lock your knees. For a deeper stretch, engage the quadriceps by lifting up on your kneecap.
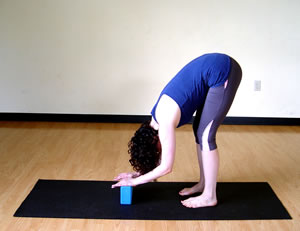
Pyramid pose (Parsvottanasana):
Benefits:
Stretches and strengthens the legs, particularly the hamstrings
How to: - Step your left foot back about 3 feet. Your left toes will pivot in at a 45 degree angle. Your right foot faces forward.
- Inhale, stand tall and lean out over the front foot.
- Drop your hands to your shin, a yoga block or on either side of your front foot. Drop your forehead so it's facing your leg.
- With every inhale, feel your spine growing longer (imagine the crown of your head reaching to the floor); with every exhale, allow the body to sink lower (the forehead is getting closer to the front leg).
- To come up, inhale and roll up slowly, pressing into your front foot for support.
- Repeat on the other side.
TIP: For a deeper stretch, interlace the fingers behind your back and roll the shoulders back and down before leaning forward.
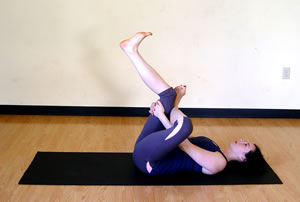
Figure 4 pose (Sucirandhrasana) :
Benefits:
Stretches the outside of the hips and the inner thighs
How to: - Lie on your back on the mat.
- Bring your knees in towards the chest, at a 90-degree angle.
- Place your right ankle on your left thigh, interlace your fingers and place them behind your left thigh, and pull your left thigh towards your chest.
- Repeat on the other side.
TIP: Flex your feet to deepen the stretch. Press your elbow against that bent knee to feel an inner thigh stretch. If you have knee problems, adjust the angle of the knee so you feel comfortable.
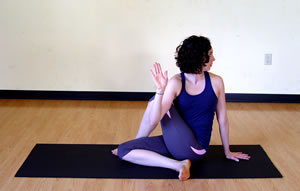
Half lord of the fishes twist (Ardha matseyendrasana):
Benefits:
Opens the shoulders, neck and hips, stretches the IT band.
How to: - Sit tall with your legs extended in front of you.
- Cross your right foot over your left leg and stand it outside your left thigh.
- Bend your left knee, tucking your left foot by your right buttock.
- Place your right hand on the mat, just behind your buttock.
- Inhale, lift your left arm in the air by your left ear.
- Exhale and twist, bringing the left elbow to the outside the right knee.
- Look back over the right shoulder.
- To release, inhale, look forward, release your arms and uncross your legs.
- Repeat on the other side.
TIP: Let the twist start in your belly not your neck.

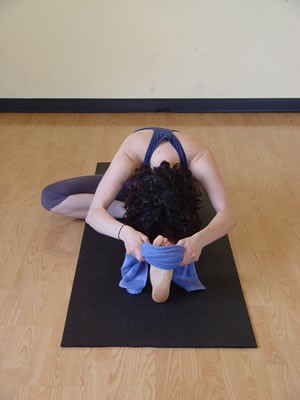
Seated forward fold (Paschimottanasana):
Benefits:
Stretches the spine and the hamstrings.
How to: - Sit on your mat, with your legs extended in front of you, heels slightly flexed and bellybutton pulled to the spine for support.
- Inhale, sit tall and raise your arms in the air.
- Exhale, lean forward and reach for your toes. Allow your arms to rest on your thighs, shins or at your ankles.
- Allow your head to drop and gaze past the end of your nose. Allow your upper body to relax.
- If you can straighten the legs, flex the feet, and engage the quadriceps (by lifting your knee cap) to keep your knees from locking.
- With every inhale, feel your spine growing longer (imagine the crown of your head reaching out in front of you to the wall); with every exhale, allow the body to sink lower (the chest is getting closer to the floor).
TIP: Can't reach your toes? Wrap a towel around your feet and grab either end with your hands to improvise a yoga strap. If your hamstrings are tight, you can bend your legs.
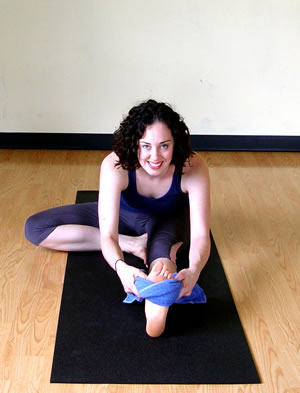
Head to knee stretch (Janu sirsasana A):
Benefits:
Stretches the hamstrings.
How to: - From the previous pose, slide your right foot inside your left thigh, the right knee coming out at least a 90-degree angle.
- Center your torso over the extended left leg and exhale as you begin to lower to that thigh.
- Flex your extended foot and reach for your toes (or use a towel as a strap).
- With every inhale, feel your spine growing longer (imagine the crown of your head reaching out in front of you to the wall); with every exhale, allow the body to sink lower (the chest is getting closer to the floor).
- Inhale as you roll slowly up and repeat on the other side.
TIP: If your knee can't rest comfortably on the floor, roll up a towel to support the bent knee.
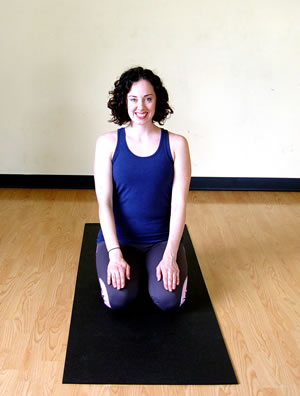
Hero pose/Thunderbolt pose (Virasana/Vajrasana):
Benefits:
Stretches the quadriceps and ankles.
How to: - Starting in a kneeling position.
For hero pose: - Keep your knees together but separate the feet and allow your bottom to rest on the floor. Roll your calves away from your thighs (use your hands) to help you get comfortable.
For a deeper stretch, try thunderbolt pose: - Sit back on your heels, shins together. (Place a rolled-up towel between your heels and hips to ease this stretch.)
TIP: If you feel any discomfort in this pose, sit on a rolled-up towel or a block.
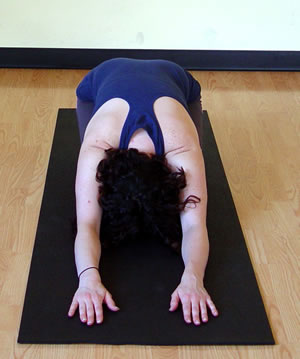
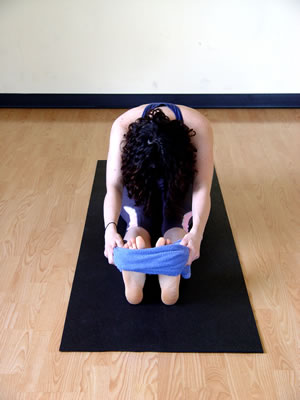
Child’s pose (Balasana):
Benefits:
Stretches hips, thighs and ankles gently; can help alleviate back pain.
How to: - From hero/thunderbolt pose, start to lower to the floor. Your belly will rest on or between your thighs, and your forehead will reach towards the mat. (Place a towel under your forehead if it won't reach the floor.
- Stretch the arms out in front of you to feel a stretch up the length of the back.
- Stretch the arms alongside the body, with the fingertips facing the toes, to stretch between the shoulder blades.
TIP: Roll your forehead back and forth across the mat with your arms along your sides to help alleviate sinus congestion.
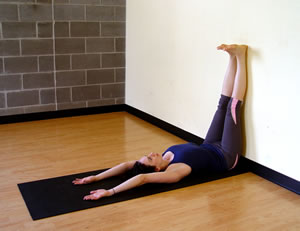
Legs up the wall (Viparita Karani):
Benefits:
Stretches the hamstrings gently, allows blood that has accumulated in the feet and legs to re-circulate in the body. Offers a gentle release for the low back.
How to: - Sit next to a wall and lie onto your back, bringing your knees into your chest.
- Straighten your legs and place them on the wall while wiggling your bottom closer to the wall.
- Allow your heels to rest gently on the wall.
- Extend the arms overhead for an added stretch.
TIP: This pose is great for anyone who works on their feet. Spend a few minutes in this pose (you can even do this in bed) each night to give your legs a break. Remember this one--it's also great after a long day of holiday shopping!
So there you have it: 13 poses to help stretch your hips and thighs! There are plenty of other poses that I could have included, but these are good ones to start with.
Do you do any of these poses? Will you try them? Do you have any questions about certain yoga poses? If there's a certain area of the body you'd like to stretch, let me know in the comments below. I plan to write more of these mini-yoga workouts.
|
|

.png)
.png)


